Jellyfish tutorial
Setting up environment from scratch
- Step 1 is to install an IDE for example like Visual Studio Code : https://code.visualstudio.com/download
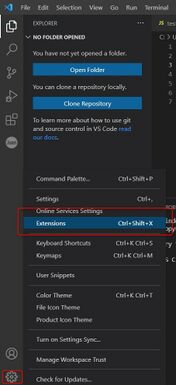
- Once Visual Studio Code is installed, the next step is to install the extensions for various programming and scripting languages like Java, Javascript, TypeScript etc in Visual Studio Code. Click to the settings icon on the lower left and select "Extensions" as shown below :
- Next step is to install Javascript and Typescript extensions , this can be done by searching on the extensions search bar and selecting the extensions to install.

Next step is to install Node JS as a platform to run javascripts from : https://code.visualstudio.com/docs/nodejs/nodejs-tutorial
We will refer to steps mentioned in https://jellyfish.defichain.com/docs/jellyfish/usage/ for the installation of jellyfish and try some test code. Please use the link as a reference and keep it open for reference.
Now we will try to install defichain/jellyfish inside Visual Studio Code IDE. For this first open the Terminal window in IDE as shown in the below image and type npm install @defichain/jellyfish and press enter. This will install the jellyfish package in your PC.

Similarly other packages like jellyfish-api-jsonrpc can be installed npm install @defichain/jellyfish-api-jsonrpc .
We need a running wallet app in our PC to start executing the code and interacting with Blockchain. Please head over to https://defichain.com/downloads/ and download the DeFi Wallet app.
Next open the wallet app and click to the "i" symbol on the bottom left corner as shown in the image below.

A new window as shown below will open. Please click to update or continue with snapshot button as shown below. This will copy a snapshot of the blockchain as a local copy to your PC. This might take some hours to fully copy.

Run example with local node
- First step to run an example is to make sure that the wallet app is open in your PC.
- Next in Visual Studio Code IDE create a new file of type javascript with an extension *.js and copy the below lines :
const jellyfish = require('@defichain/jellyfish')

const client = new jellyfish.Client('http://username:password@localhost:8555', {  timeout: 200000})

client.mining.getMiningInfo().then((info) =\> {  console.log(info)})

console.log('Hello World');
In the above code in second line, username and password is your username password which is stored in the file:
C:\Users\your_user\\.defi\defi.conf. Also please check if the port 8555 is correct. Refer to image below:

- Next run the code in IDE as shown below and in the console of IDE we can see the mining info.


- We can also get the mining info in many other methods as documented in: https://jellyfish.defichain.com/docs/jellyfish/usage/. For example JsonRpcClient. To use this method create a file of type *.mjs and open it in the Visual Code IDE and run the following code:
import { JsonRpcClient } from '@defichain/jellyfish-api-jsonrpc

const client = new JsonRpcClient('http://username:password@localhost:8555')

client.mining.getMiningInfo().then((info) =\> {  console.log(info)})

console.log('Hello World');
Do not forget to change the username and password :-). Once this code is executed, similar output for mining info will be shown in the console. Similarly more APIs mentioned in https://jellyfish.defichain.com/docs/jellyfish/usage/ can be used. Have Fun!! :)
